You know, it’s been my dream to build a gaming computer for a while. I had talked about it with friends jokingly for a minute, but back in January, I finally sat down and made it happen. I haven’t used Windows in almost 10 years, since my freshman year of University, but during that time, I also switched to using macOS. I came to fall in love with the UNIX environment that macOS provides, while also being able to use macOS for my design classes. The design school labs all had Mac Pros in them, which was pretty dope, and I wanted to make sure that I kept my workflow the same between both of them. Now, fast forward to the present, I finally had some extra cash that I could use to build a pretty sick gaming computer.
When I was taking notes on what kind of computer I wanted, I outlined the following criteria.
- I wanted to experiment with an AMD build, given the awesome reviews I’ve heard about their CPUs.
- I wanted to have a top of the line GPU. I couldn’t bring myself to actually shell out the dough for a 2080 TI, but, I figured that the 2070 TI would be good enough.
- As a frequent lurker of the sffpc subreddit, I wanted to have a small form factor case. I actually had bought a Dan Case A4 v2 back in 2018 or so, but once against procrastinated on actually buying parts for it. So, I was fortunate to already have this case lying around.
With that, I started doing my research and asking my friends. My buddy Justin, was an amazing source of knowledge and also helped me figure out minor details I missed while making my parts list. After a day or so of research and messing around, I finally had a finalized parts list and we were ready to order and build.

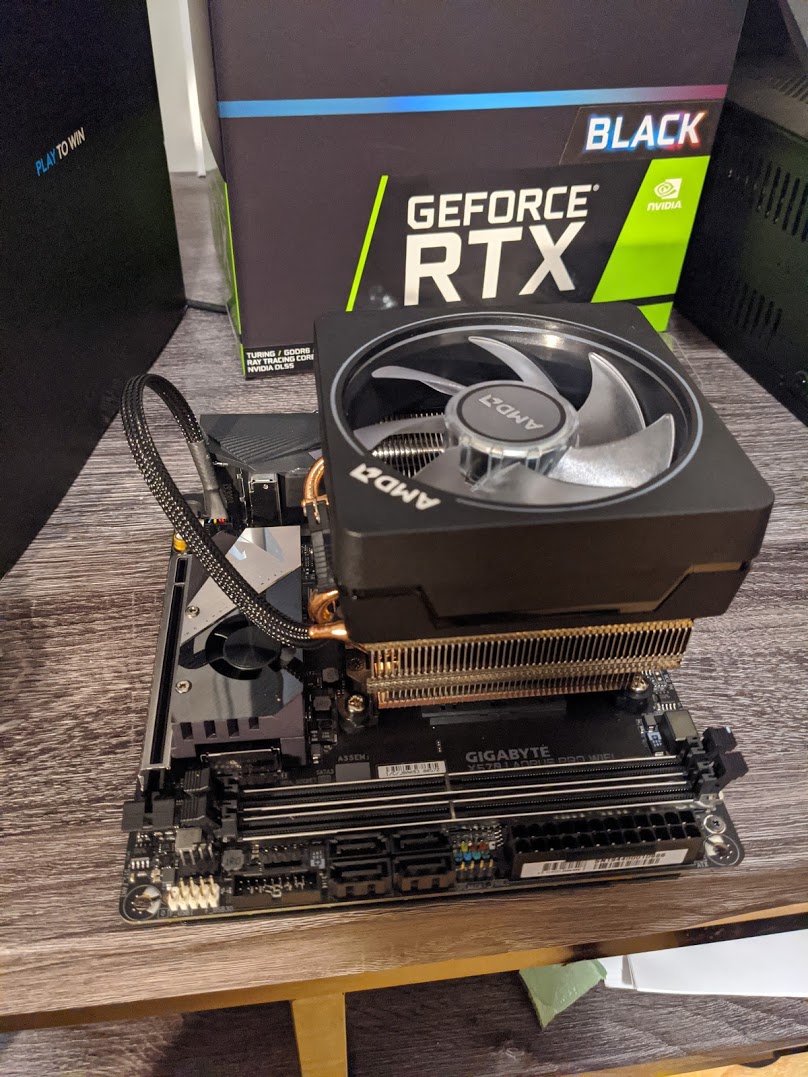
With the parts all ordered, it was time to get building! The first thing was getting the CPU installed in the motherboard properly. For the motherboard, I went with the X570 Aorus Pro Wifi Motherboard, primarily because it was the one I found that was AMD-compatible and also had a Wifi card built into it.

For the CPU, I ended up going with the AMD Ryzen 7 3800X, it seemed to have the best balance of both price and performance that I was looking for in a CPU, which was perfect.

First things first, it still amazes me how much power is installed in such a tiny little square. This tiny little thing is responsible for some hardcore computing power? It blows my mind. It was also quite easy to install, just dropping it in the relevant square and you’re finished.

I had my first hitch with the build because I ordered the wrong Noctua Fan that I purchased had the wrong mounting brackets. I didn’t realize the “i” in that stood for Intel. But, luckily, my CPU came with a stock fan, so I ended up just installing that temporarily and figuring out the fan situation later. Afterwards, installing the memory was the easy part, you just click those bad boys in and you’re good to go.
With the motherboard pretty much all put together, it was time to start putting it together in the case. Like I mentioned earlier, I had a Case Case A4-SFX v2 that I had ordered from Kickstarter years ago, but never ended up using…until now. It was literally collecting dust in my closet for years. So, it was time to get installing. First thing I installed in the case was the power supply unit, because that’s where everything was going to be hooked up into.

Afterwards, I went ahead and started installing and mounting the CPU and my graphics card. Rather than buying a 2080, I went with the RTX 2070 Super Black because I figured that would be good enough for gaming at high graphics at a 1440p resolution. I kind of did the whole “draw an owl” meme here and forgot to actually take photos of this in-between process of installing these parts.

 Step 1, draw two circles. Step 2, draw the rest of the fucking owl.
As you can see, I had a computer up and running, even though it looks like a time machine of sorts. And there was no way in hell that my computer was going to close with that big ass fan protruding. But, this was enough for me to get the machine up and booting and start gaming on it, which was great. After a couple of weeks, Noctua actually ended up releasing an AMD version of the original fan I purchased, and even better, it was all black. I ordered it and received it with two day shipping quite quickly, and wasted no time in installing it.

Honestly, because of how sloppily my cables are connected, I wasn’t able to close the case on the side of the CPU. And plugging things into this computer was quite painful because the case is small and I don’t have small hands. So, for now, the case runs while being opened up. Eventually, I will actually get some better cables for the case and redo the cabling, but for now, I don’t care so long as it runs.
It feels good to finally be gaming on a computer and I am also excited to do more programming on my Windows machine. I’ve had this computer for almost 3 months now and I’m using it for both gaming and working on my non-work related code. I’ll have to talk more about my experience programming on Windows in a separate blog post though, because I have a lot of thoughts on it! But, in the meantime, enjoy this video of me and Scott Hanselman getting WSL up and running on my new Windows box. Thanks for reading, feel free to reach out to me on on Twitter with any Windows 10 tips that you may have or to talk more about building a computer.